Where to begin with the kitchen!? This was the most time consuming project of them all and required a full gut job. The kitchen renovation cost me about $15,000 but was worth every penny!
Here’s a few before and after pictures of the kitchen


Before Pictures –


Demolition Day –
I’m extremely fortunate to have the most amazing friends! Many of them joined me in the demo party the first week I purchased the house!


The kitchen had a soffit ceiling (apparently the style back in the day). It’s a gallery kitchen so in order to make it look bigger, we took out the soffit ceiling. You

One of 3 dumpsters used during demolition
can see my friends on the left taking sledge hammers to the ceiling. Make sure you wear masks, goggles and I’d recommend covering any exposed skin due to insulation with fiberglass falling down from the ceiling.
One thing I would recommend doing yourself is the insulation. This wasn’t too hard but requires 2 people. One to hold up the insulation and the other to staple into the ceiling beams. My dad and I completed this project together!

I would not recommend completing any sheet rock installation yourself. The only good memories I had from this experience was the wine my sister and I drank while trying to figure out how to install this crap. Ha! Needless to say, we completed the installation but I had to hire someone to fix our installation hack job. The original bid I had for the ceiling and partial walls was $2,000 and because my sister and I installed the sheet rock ourselves, I only had to pay for the tape and mud job which came to $400. Yes, I saved money but I sure wouldn’t recommend it!
Project Management Skills Put to Work –
Completing a renovation is all about project management skills. The timing of when to schedule the contractors and what needs to be completed first is the hardest part of any renovation.
With the demolition, insulation and dry wall complete, it was time to move on to other tasks in the kitchen. I sequenced the tasks in the following order – Electrical rough in, paint, floor install, cabinet install, counter top install, final electrical/plumbing appliance install.
I had 3 electrical bids (always get several bids). The electrician will come in and complete the rough in for the wiring before you begin the major installs like cabinets or appliances. In addition to hooking up the appliances, I had them install 2 recessed can lights and 4 under cabinet lights. Once the rough in was complete then I was able to start painting!
Since I had fresh sheet rock, I needed dry wall primer for the ceiling. I primed the ceiling with 2 coats of primer and 2 coats of paint. I completed 2 coats of paint on the walls and used Sherwin-Williams Repose Gray (SW 7015) for the color throughout the main floor.
Now that the painting and rough in’s for the electrical were complete, it was time to do the hardwood floors for the kitchen and the entry way. I have hardwood throughout the main floor so my contractor matched the same color and it turned out great!


Cabinets were up next! The kitchen really starts taking shape once these go in. I used a big box online cabinet retailer for this purchase. I measured the walls so I knew exactly how much space I had to work with when ordering my cabinets (be sure you order your cabinets weeks ahead of time since the lead time can be long). I had an independent contractor come in to install the cabinets.
Now that the cabinets were in, the counter tops and sink could be installed followed by the electrician coming in to finish the final electrical work and the plumber to hook up the sink, disposal and refrigerator. If you have a small galley kitchen I would highly recommend finding a counter top store that has a remnant left over from someone else’s project. I saved $20/ft on mine because I found a remnant at Stone Masters and only needed 26 square feet.
After Pictures –


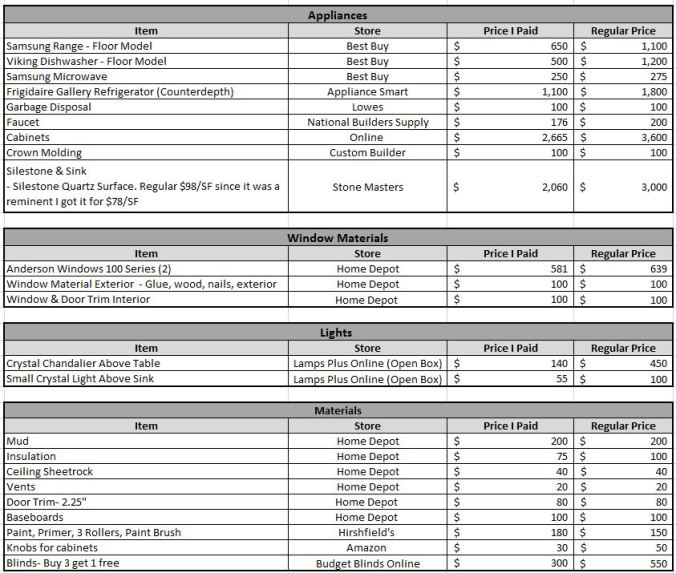
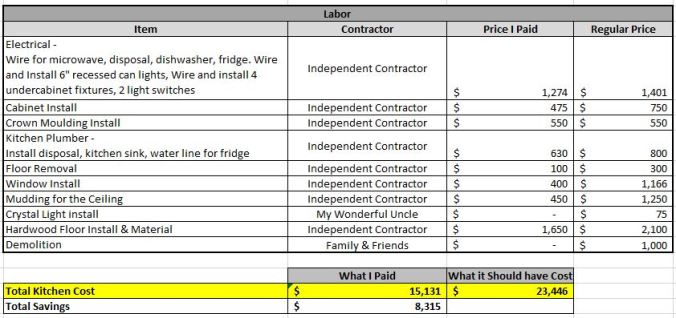
Total Kitchen Cost-
It was really helpful for me to talk to other people who were renovating about prices and where to find the best deals so I thought I would include a break down of the costs associated with the kitchen.I included a column for what I actually paid versus what the price should have been. I was able to get discounts if I paid in cash for most labor expenses and also purchased most materials on sale. These were huge $$ savings just by getting thrifty and asking for discounts if paying in cash.
The total kitchen renovation ended up costing me $15,131. If I hadn’t asked for cash discounts, purchased things on sale or completed some of the work myself then the full renovation would have cost $23,446. That’s $8,315 in savings!

Pingback: Kitchen | Ladies Renovate 2